Difference between revisions of "Netsville Mail Administration"
Jump to navigation
Jump to search
| (7 intermediate revisions by the same user not shown) | |||
| Line 1: | Line 1: | ||
| + | == Logging in == | ||
| + | # Navigate to https://securemail.netsville.com in your web browser | ||
| + | #*[[File:Postmaster Login - 1.png|thumb|825px|none|Securemail homepage (https://securemail.netsville.com)]] | ||
| + | # Click on the "Webmail Administration" icon | ||
| + | #*[[File:Postmaster Login - 2.png|thumb|825px|none|Webmail administration icon]] | ||
| + | #*[[File:Postmaster Login - 3.png|thumb|825px|none|Webmail administration login page]] | ||
| + | # Fill in postmaster credentials (ex. postmaster@yourdomain.com) and click "Log In" | ||
| + | #*[[File:Postmaster Login - 4.png|thumb|825px|none|Webmail administration login page (filled out)]] | ||
| + | # Success! | ||
| + | #*[[File:Postmaster Login - 5.png|thumb|825px|none|Postmaster splash screen after login]] | ||
| + | |||
== Creating an email account == | == Creating an email account == | ||
# Click "Add new e-mail account" on the left hand menu | # Click "Add new e-mail account" on the left hand menu | ||
| Line 11: | Line 22: | ||
#*[[File:Create Email Account - 5.png|thumb|825px|none|"View all e-mail accounts" page after steps]] | #*[[File:Create Email Account - 5.png|thumb|825px|none|"View all e-mail accounts" page after steps]] | ||
| − | == Creating an alias with an existing email account == | + | == Creating an alias == |
| + | #*[[File:Email Alias Create - 1.png|thumb|825px|none|Webmail administration splash screen]] | ||
| + | #*[[File:Email Alias Create - 2.png|thumb|825px|none|Alias create screen]] | ||
| + | ==== Local Alias Mapping ==== | ||
| + | #*[[File:Email Alias Create - 3.1.png|thumb|825px|none|Local alias creation]] | ||
| + | #*[[File:Email Alias Create - 3.2.png|thumb|825px|none|Local alias creation success message]] | ||
| + | #*[[File:Email Alias Create - 3.3.png|thumb|825px|none|Showing newly created local alias]] | ||
| + | ==== Remote Alias Mapping ==== | ||
| + | #*[[File:Email Alias Create - 4.1.png|thumb|825px|none|Remote alias creation]] | ||
| + | #*[[File:Email Alias Create - 4.2.png|thumb|825px|none|Remote alias creation success message]] | ||
| + | #*[[File:Email Alias Create - 4.3.png|thumb|825px|none|Showing newly created remote alias]] | ||
| + | |||
| + | == Alias with an existing email account == | ||
One advantage of this system is the ability to create multiple aliases that point to an existing email account. The steps below only show one alias being created, but repeating steps 7-9 with the same account one can create multiple aliases. | One advantage of this system is the ability to create multiple aliases that point to an existing email account. The steps below only show one alias being created, but repeating steps 7-9 with the same account one can create multiple aliases. | ||
| − | # Choose an existing account you would like to create a | + | # Choose an existing account you would like to create a alias with, as well as receive mail |
| − | #*[[File:Forward With Email Account - 1.png|thumb|825px|none|The email account we are | + | #*[[File:Forward With Email Account - 1.png|thumb|825px|none|The email account we are sending a copy]] |
# Select the "Add new e-mail alias" in the menu on the left | # Select the "Add new e-mail alias" in the menu on the left | ||
#*[[File:Forward With Email Account - 2.png|thumb|825px|none|Adding a new alias]] | #*[[File:Forward With Email Account - 2.png|thumb|825px|none|Adding a new alias]] | ||
| Line 27: | Line 50: | ||
#*[[File:Forward With Email Account - 6.png|thumb|825px|none|Adding a new alias]] | #*[[File:Forward With Email Account - 6.png|thumb|825px|none|Adding a new alias]] | ||
# Creating the alias pointing to desired destination | # Creating the alias pointing to desired destination | ||
| − | #*[[File:Forward With Email Account - 7.png|thumb|825px|none|Mapping alias | + | #*[[File:Forward With Email Account - 7.png|thumb|825px|none|Mapping alias, pointing to the destination account]] |
# Submit the new changes | # Submit the new changes | ||
#*[[File:Forward With Email Account - 8.png|thumb|825px|none|Submitting the new alias changes]] | #*[[File:Forward With Email Account - 8.png|thumb|825px|none|Submitting the new alias changes]] | ||
# How everything show look when you are finished | # How everything show look when you are finished | ||
#*[[File:Forward With Email Account - 9.png|thumb|825px|none|Showing the final results]] | #*[[File:Forward With Email Account - 9.png|thumb|825px|none|Showing the final results]] | ||
Latest revision as of 23:52, 16 February 2016
Contents
Logging in
- Navigate to https://securemail.netsville.com in your web browser
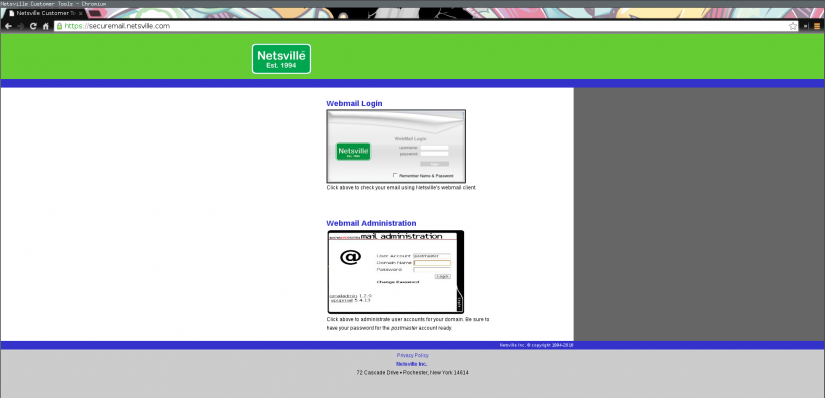 Securemail homepage (https://securemail.netsville.com)
- Click on the "Webmail Administration" icon
- Fill in postmaster credentials (ex. postmaster@yourdomain.com) and click "Log In"
- Success!


Creating an email account
- Click "Add new e-mail account" on the left hand menu
- Fill in the desired new account information
- Submit the account information for creation
- All finished!


Creating an alias


Local Alias Mapping


Remote Alias Mapping


Alias with an existing email account
One advantage of this system is the ability to create multiple aliases that point to an existing email account. The steps below only show one alias being created, but repeating steps 7-9 with the same account one can create multiple aliases.
- Choose an existing account you would like to create a alias with, as well as receive mail
- Select the "Add new e-mail alias" in the menu on the left
- Create the mapping such that the name of the alias is the same as the name of the email account.
- Point the mapping to the actual email account
- Submit the new changes
- Here is what was created from the previous steps
- Select the "Add new e-mail alias" in the menu on the left for creating desired alias
- Creating the alias pointing to desired destination
- Submit the new changes
- How everything show look when you are finished


